This Vanilla Biscoff Cheesecake is rich, creamy, and baked low and slow for a smooth, beautiful finish. It starts with a buttery Biscoff cookie crust and finishes with a vanilla-forward cheesecake filling that sets perfectly after an overnight chill. If you love cheesecake but have felt intimidated by cracks, soggy crusts, or uneven texture, this recipe is for you. I don't just walk you through the steps, I explain why they matter, so you can bake with confidence and understand what's happening in your oven. Prep Time: 25 minutes | Bake Time: 60 to 75 minutes | Rest + Chill Time: 30 minutes rest, overnight chill | Yield: 1 (9-inch) cheesecake
Key Takeaways
- This Biscoff cheesecake features a buttery cookie crust and a smooth, vanilla-forward filling, perfect for cheesecake lovers.
- The recipe emphasizes techniques to prevent common issues like cracking, with tips for baking and cooling.
- Using quality ingredients makes a difference; full-fat cream cheese and Greek yogurt enhance texture and flavor.
- A water bath regulates temperature, ensuring even baking, while a thermometer helps achieve perfect doneness.
- This cheesecake is make-ahead friendly, ideal for occasions like Valentine's Day and Christmas.
Why You'll Love This Biscoff Cheesecake
Cheesecake has always been one of my husband's favorite desserts, which means over the years I've baked more than a few trying to get it just right for him. And if I'm being honest, cheesecake and I did not start out as friends.
I've had cracked tops, underbaked centers, and crusts that soaked up water like a sponge. Those failures are exactly why this recipe exists. This is the version that finally made everything click for me, and it's the one I trust when I want a cheesecake that feels special but still works in a real family kitchen.
The Biscoff cookie crust brings a warm, lightly spiced flavor that instantly sets this cheesecake apart from a standard graham cracker version. The vanilla cheesecake filling is smooth, rich, and balanced, not overly sweet or heavy.
What really makes this recipe stand out is how reliable it is. Cheesecake does not have to feel like a gamble. This one is mixed gently, baked at a low temperature, and cooled slowly, which gives you a creamy texture without cracks.
It's also naturally make-ahead, which is a gift during busy seasons. Whether you're baking for Valentine's Day, Christmas, or a family gathering, this is a dessert you can make with confidence and serve proudly.
Jump to:
- Key Takeaways
- Why You'll Love This Biscoff Cheesecake
- Ingredients Matter in Cheesecake
- Tools I Rely On in My Home Kitchen
- How to Make Vanilla Biscoff Cheesecake
- Why Cheesecakes Crack (And How I Learned to Prevent It)
- Kendra's Top Cheesecake Tips (From Years of Trial and Error)
- Cheesecake Recipe FAQs
- Recipe
- Perfect for Valentine's Day and Christmas Baking
- If You Loved This, Try These!
- Comments
Ingredients Matter in Cheesecake
Cheesecake looks simple on paper, but every ingredient plays a specific role. Because there aren't many of them, quality and balance matter.
Biscoff Cookie Crust
- Biscoff cookies
- Salted butter, melted
Processing the cookies into fine crumbs helps the crust hold together evenly. Larger chunks can create weak spots where moisture sneaks in later.
I use salted butter in the crust intentionally. That touch of salt balances the sweetness of the Biscoff cookies and keeps the crust from tasting flat. It's a small detail that makes a noticeable difference.
Pre-baking the crust is essential. That short bake sets the structure so it stays crisp once the cheesecake filling is added.
Cheesecake Filling
- Full-fat cream cheese, room temperature
- Granulated sugar
- Plain full-fat vanilla Greek yogurt
- Salted butter, melted and slightly cooled
- Eggs, room temperature
- Vanilla bean paste or pure vanilla extract
- Salt
Full-fat cream cheese provides structure. Reduced-fat versions contain more water, which can prevent the cheesecake from setting properly.
The Greek yogurt adds a gentle tang and helps lighten the texture without sacrificing richness. I also use salted butter in the filling to balance sweetness and enhance the vanilla flavor.
Eggs are what allow the cheesecake to set as it bakes, and using them at room temperature helps them blend smoothly into the batter without overmixing.
Tools I Rely On in My Home Kitchen
You don't need professional equipment to bake a great cheesecake, but a few tools make the process easier and more predictable.
A 9-inch springform pan allows you to release the cheesecake cleanly without disturbing the sides.
A water bath is something I avoided early on because it felt intimidating. Looking back, nearly every cracked cheesecake I made before this recipe can be traced back to skipping this step. A water bath helps regulate oven temperature and creates a gentle, moist environment so the cheesecake bakes evenly.
I mix cheesecake batter in my KitchenAid stand mixer because it allows smooth, controlled mixing. Cheesecake does not need to be whipped. It needs to be gently combined.
A thermometer is the single most confidence-boosting tool I use. Cheesecake is done by temperature, not by appearance, and guessing often leads to overbaking.

How to Make Vanilla Biscoff Cheesecake
Prepare the Pan
Preheat your oven to 350°F for the crust. Grease a 9-inch springform pan and line the bottom with parchment paper.
If you plan to use a water bath, wrap the outside of the pan tightly with foil. This protects the crust from absorbing water and prevents sogginess.
Make the Biscoff Crust
Process the Biscoff cookies into fine crumbs until you have about two cups. Stir in the melted butter until evenly combined.
Press the mixture gently into the bottom of the pan and slightly up the sides. You don't need to pack it aggressively. Gentle pressure is enough.
Bake the crust for 10 minutes, then remove it from the oven and reduce the oven temperature to 300°F.
Make the Cheesecake Batter
Beat the cream cheese until completely smooth. This step matters more than most people realize. Any lumps here will stay in the finished cheesecake.
Add the sugar and mix until fully incorporated. Then add the Greek yogurt, melted butter, vanilla, and salt, scraping the bowl frequently.
Add the eggs one at a time, mixing just until combined. Overmixing at this stage incorporates air, which expands during baking and contracts during cooling, leading to cracks.
The finished batter should be thick, silky, and uniform.
Bake the Cheesecake
Pour the batter over the crust and smooth the top. Place the pan into the water bath.
Bake at 300°F for 60 to 75 minutes, until the center reaches an internal temperature of 145°F. The edges should be set, while the center still has a slight jiggle.
Turn the oven off, crack the door open, and let the cheesecake rest inside for 30 minutes. This slow transition helps prevent cracking.
Cool and Chill
Remove the cheesecake and let it cool completely at room temperature. Once cooled, cover and refrigerate overnight before removing the springform ring or slicing.
Cheesecake needs time to finish setting. Cutting too early often results in a soft or uneven texture.
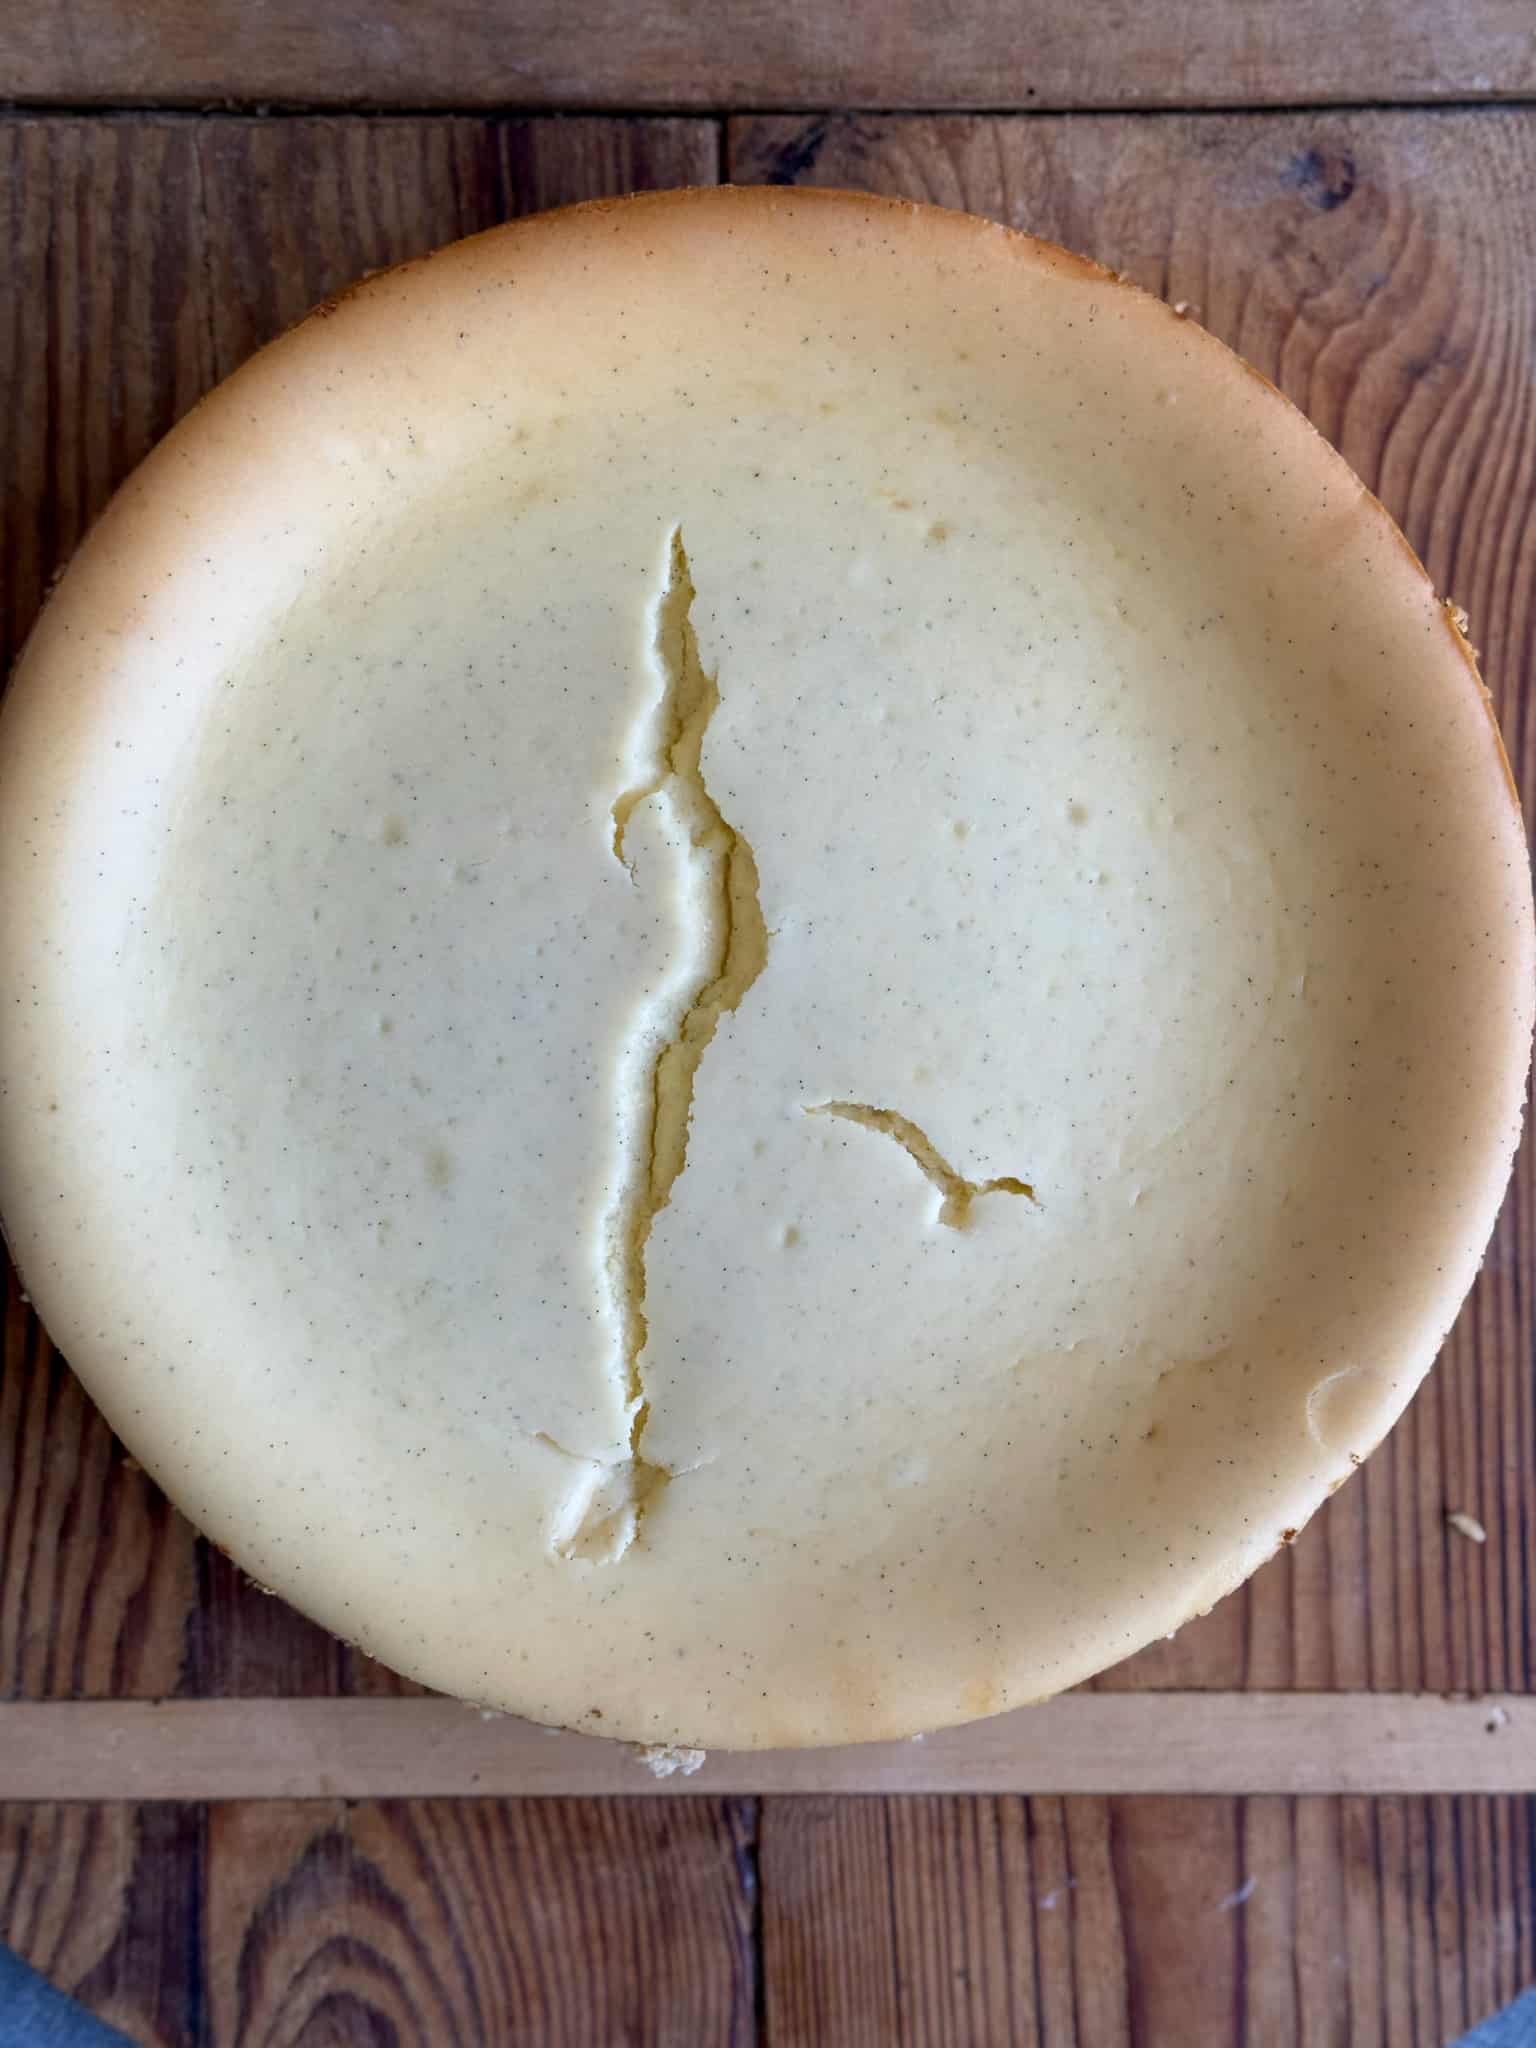
Why Cheesecakes Crack (And How I Learned to Prevent It)
Cheesecake cracking is incredibly common. If it's happened to you, you didn't do anything wrong.
I bring this up because it's something I had to learn through experience. Cracks are almost always the result of air, heat, or sudden temperature changes.
Overmixing adds air. Baking at too high a temperature causes the edges to set before the center. Skipping the water bath removes the moisture that protects the surface. Cooling too quickly causes the cheesecake to contract abruptly.
This recipe is written for home bakers who want to understand what's happening, not just follow steps. Once you know why cheesecake cracks, it becomes much easier to prevent it.
Kendra's Top Cheesecake Tips (From Years of Trial and Error)
Use room temperature ingredients. Cold cream cheese leads to lumps and forces you to overmix.
Mix gently once the eggs are added. Cheesecake batter should be smooth, not fluffy.
Bake low and slow. Cheesecake needs gentle heat to set evenly from edge to center.
Use a thermometer. When the center reaches 145°F, the cheesecake is done, even if it still jiggles slightly.
Cool gradually. That rest in the oven matters more than it seems.
For clean slices, wipe the knife between cuts and slice when fully chilled.

Cheesecake Recipe FAQs
Cheesecakes crack when they bake unevenly or cool too quickly. Common causes include overmixing, baking at too high a temperature, skipping a water bath, or removing the cheesecake from the oven too abruptly.
A water bath helps regulate oven heat and creates a humid environment that allows the cheesecake to bake evenly. This prevents the surface from drying out and cracking.
Cheesecake is done when the center reaches an internal temperature of about 145°F. The edges should be set, and the center should still have a slight jiggle.
Yes. Cheesecake is best made at least one day ahead. The overnight chill allows it to fully set and improves texture.
Yes. Wrap tightly and freeze for up to three months. Thaw overnight in the refrigerator before serving.
Stored covered, cheesecake will keep for up to five days. Though, my husband never lets it last that long in the fridge.
Recipe
Vanilla Biscoff Cheesecake
Equipment
- 1 9-inch springform pan Essential for clean edges and easy removal once the cheesecake is fully chilled.
- 1 food processor Used to turn Biscoff cookies into fine crumbs for an even, sturdy crust.
- 1 stand mixer I use my KitchenAid stand mixer, but a hand mixer works just fine. The key is gentle, even mixing.
- 1 large mixing bowl For combining the cheesecake filling smoothly and evenly.
- 1 Rubber Spatula Important for scraping the bowl so everything mixes without overworking the batter.
- Measuring Cups and Spoons Cheesecake is precise, so accurate measuring matters here.
- 1 Roasting pan or large baking dish Used to hold the springform pan when baking in a water bath.
- 1 Aluminum foil To wrap the springform pan and protect the crust during the water bath.
- 1 Instant read thermometer The most reliable way to know when your cheesecake is done without guessing.
- 1 parchment paper Lining the bottom of the pan makes removal easier and cleaner.
- 1 Sharp knife For clean, even slices once the cheesecake is fully chilled.
Ingredients
Biscoff Crust
- 32 Biscoff cookies about 8.8 oz / 250 g
- 5 tablespoons salted butter melted
Cheesecake Filling
- 32 oz full-fat cream cheese room temperature (4 blocks)
- 1½ cups granulated sugar
- 1½ cups plain full-fat vanilla Greek yogurt
- 8 tablespoons salted butter melted and slightly cooled
- 5 large eggs room temperature
- 2 teaspoons vanilla bean paste or pure vanilla extract
- ½ teaspoon salt
Instructions
- Preheat the oven to 350°F (177°C) for the crust. Grease a 9-inch springform pan and line the bottom with parchment paper. If using a water bath, wrap the outside of the pan tightly with foil to prevent leaks.
- Add the Biscoff cookies to a food processor and process until fine crumbs form, about 2 cups. Stir the crumbs together with the melted butter until evenly combined.32 Biscoff cookies, 5 tablespoons salted butter
- Gently press the crust mixture into the bottom of the prepared pan and slightly up the sides. Bake for 10 minutes, then remove from the oven. Reduce the oven temperature to 300°F (150°C).
- In a large bowl, beat the cream cheese until completely smooth and creamy. Take your time here. This step sets the foundation for a lump-free cheesecake.32 oz full-fat cream cheese
- Add the sugar and beat until fully incorporated. Scrape down the sides and bottom of the bowl to ensure everything mixes evenly.1½ cups granulated sugar
- Mix in the Greek yogurt, melted butter, vanilla, and salt. Continue scraping the bowl as needed so the batter stays smooth and uniform.1½ cups plain full-fat vanilla Greek yogurt, 8 tablespoons salted butter, 2 teaspoons vanilla bean paste or pure vanilla extract, ½ teaspoon salt
- Add the eggs one at a time, mixing well after each addition. Once the eggs are added, mix gently. Overmixing at this stage adds air, which can lead to cracks as the cheesecake cools. The batter should be thick, silky, and smooth.5 large eggs
- Pour the cheesecake batter over the pre-baked crust and smooth the top.
- Place the springform pan into a roasting pan or large baking dish. Carefully pour hot water into the outer pan until it reaches about halfway up the sides of the springform pan, creating a water bath. This helps the cheesecake bake gently and evenly.
- Bake at 300°F for 60 to 75 minutes, until the center reaches an internal temperature of 145°F. The edges should be set, and the center should still have a slight jiggle.
- Turn the oven off, crack the oven door open slightly, and allow the cheesecake to rest in the oven for 30 minutes. This gradual cooling helps prevent cracks.
- Remove the cheesecake from the oven and let it cool completely at room temperature.
- Once cooled, cover and refrigerate overnight before removing the springform ring or slicing. Cheesecake needs time to fully set, and this step makes all the difference.
Notes
Beating the cream cheese until completely smooth before adding anything else is one of the most important steps. If the cream cheese is cold or rushed, you’ll end up with lumps that never fully smooth out later. I’ve learned this the hard way more than once. Gentle mixing makes a difference.
Once the eggs are added, mix just until combined. Cheesecake batter should be smooth, not fluffy. Overmixing adds air, and that air is one of the main reasons cheesecakes crack as they cool. Why the water bath matters.
A water bath helps the cheesecake bake gently and evenly by regulating the oven temperature and adding moisture to the environment. This keeps the edges from baking too quickly and protects the surface from drying out. If you’ve ever had a cheesecake crack down the center, skipping this step is often the reason. Use a thermometer if you can.
Cheesecake is done by temperature, not by looks. When the center reaches about 145°F, it will finish setting as it cools. This takes the guesswork out and prevents overbaking, which can lead to a dry texture. That oven rest is not optional.
Letting the cheesecake sit in the turned-off oven with the door cracked for 30 minutes allows it to cool slowly. Sudden temperature changes can cause the cheesecake to contract too quickly, which leads to cracks. Chilling overnight is part of the recipe.
Cheesecake needs time to fully set. I know it’s tempting to slice early, especially when kids are asking, but the overnight chill gives you clean slices and the best texture. If it cracks anyway, don’t panic.
Even with perfect technique, small cracks can happen. They don’t affect flavor at all. A cheesecake with a crack still tastes just as good, and once it’s sliced, no one notices. This is the cheesecake I make when I want something special that I know will turn out. It’s dependable, forgiving, and worth the time, especially when you’re baking for the people you love.
Nutrition
Perfect for Valentine's Day and Christmas Baking
This Vanilla Biscoff Cheesecake works beautifully as a Valentine's Day cheesecake when you want something elegant but approachable. The warm spice of the Biscoff crust makes it feel intentional and a little indulgent without being over the top.
It also fits naturally into Christmas baking plans. Because it's made ahead, it frees you up on a busy holiday and gives you a dessert that slices cleanly and serves beautifully.
If you're planning holiday baking, this is a great cheesecake to make first and check off your list. If you make this, I would love for you to rate it and leave a comment. It helps other home bakers know what to expect. And if you're planning ahead for Christmas, Valentine's Day, or other celebrations, save this recipe or share it with someone who loves classic desserts.
About Kendra Boettner
Hi, I'm Kendra, wife, mom of three, and the baker behind The Baker's Table. After 20+ years baking at home, including time working in professional kitchens, these are some of my favorite recipes I've learned along the way.
🧁 Want to see more? Join me on Instagram, Facebook, and Pinterest
1️⃣ My 'The Best No Bake Oatmeal Cookie" was my #1 recipe in 2025! Easy and kid friendly!
📋 Here are Kendra's favorite recipes
🍪 Or start with some of our readers' favorites:
- The Best Easy Pie Crust Recipe (Flaky and Foolproof)
- The Best Homemade Brownies (Chewy, Fudgy!)
- Lemon Meringue Bars with Swiss Meringue
- Cake Pucks Made Easy (Cake Pops without the Sticks)
- No-Bake Chocolate Mousse Pie with Oreo Crust
📋 Browse all of my recipes
🔗 The Baker's Table is Featured in:
🔗 Visit the About Me page to learn more about Kendra, Eric, and The Baker's Table!

Comments
No Comments