This easy pie crust recipe is the kind of foundational bake that brings every dessert together. Buttery, flaky, and rich, it's tender enough to melt in your mouth yet sturdy enough to hold even the juiciest fruit filling. The higher butter ratio gives it incredible flavor, while a splash of apple cider vinegar and the beggar's purse method ensure perfect flakiness every time. Whether you're baking pumpkin pie for the holidays or a summer berry pie on a quiet weekend, this is the only pie crust recipe you'll ever need. Prep: 20 minutes | Chill: 1 hour | Total: About 1 hour 30 minutes | Yield: Two 9-inch crusts (for one double-crust pie or two single-crust pies)

A Family Tradition, One Pie at a Time
Some recipes carry generations inside them. This one does.
I learned how to make pie crust standing next to my mom decades ago, flour dusting the counter and our sleeves, while my sisters leaned in to help cut butter into flour. Now my daughters do the same beside me, their small hands pressing dough as we talk and laugh our way through the holidays.
Every Thanksgiving and Christmas, we gather around the counter with the same goal; not perfection, but fellowship. This crust has seen apple pies for summer picnics, chocolate pies for birthdays, and pumpkin pies cooling on counter for family gatherings. It's the one I trust, the one I teach, and the one I'll pass down.
I use this pie crust recipe in my Easy Classic Pumpkin Pie Recipe, which my mom and I have perfected over decades of baking together. It's the perfect, American classic pumpkin pie, that's easy and better than any restaurant buy. This easy classic pumpkin pie recipe has been passed down and perfected through generations. With a silky, spiced pumpkin filling and buttery homemade crust, it's a Thanksgiving tradition worth keeping. Simple to make, rich in flavor, and filled with gratitude. This is the kind of pie that brings family together and reminds us why we bake.
Jump to:
- A Family Tradition, One Pie at a Time
- Why You'll Love This Pie Crust Recipe
- Ingredients You Need and Why
- Step by Step Guide
- Tips, Tools, and Troubleshooting
- Variations, Substitutions, and Storage
- Pie Crust Recipe FAQs
- Recipe
- The Best Easy Pie Crust Recipe (Flaky & Foolproof)
- What to Bake Next
- If You Loved This, Try These!
- Comments
Why You'll Love This Pie Crust Recipe
This pie crust (with butter) is as reliable as it is delicious. It's rich, flaky, and flavorful, with balanced sweetness that complements any filling.
- Flaky, buttery layers created by cold butter that steams during baking.
- Easy to make with a food processor and simple, forgiving technique.
- Perfectly balanced flavor from salted butter and a hint of apple cider vinegar.
- Versatile base for sweet or savory pies, from quiche to pumpkin pie.
- Freezer-friendly for make-ahead baking during busy holidays.
If you love recipes that make memories, try my Pumpkin Cheesecake or one of my top 12 favorite fall recipes next. All of my recipes start with simple ingredients and end with joy around the table.
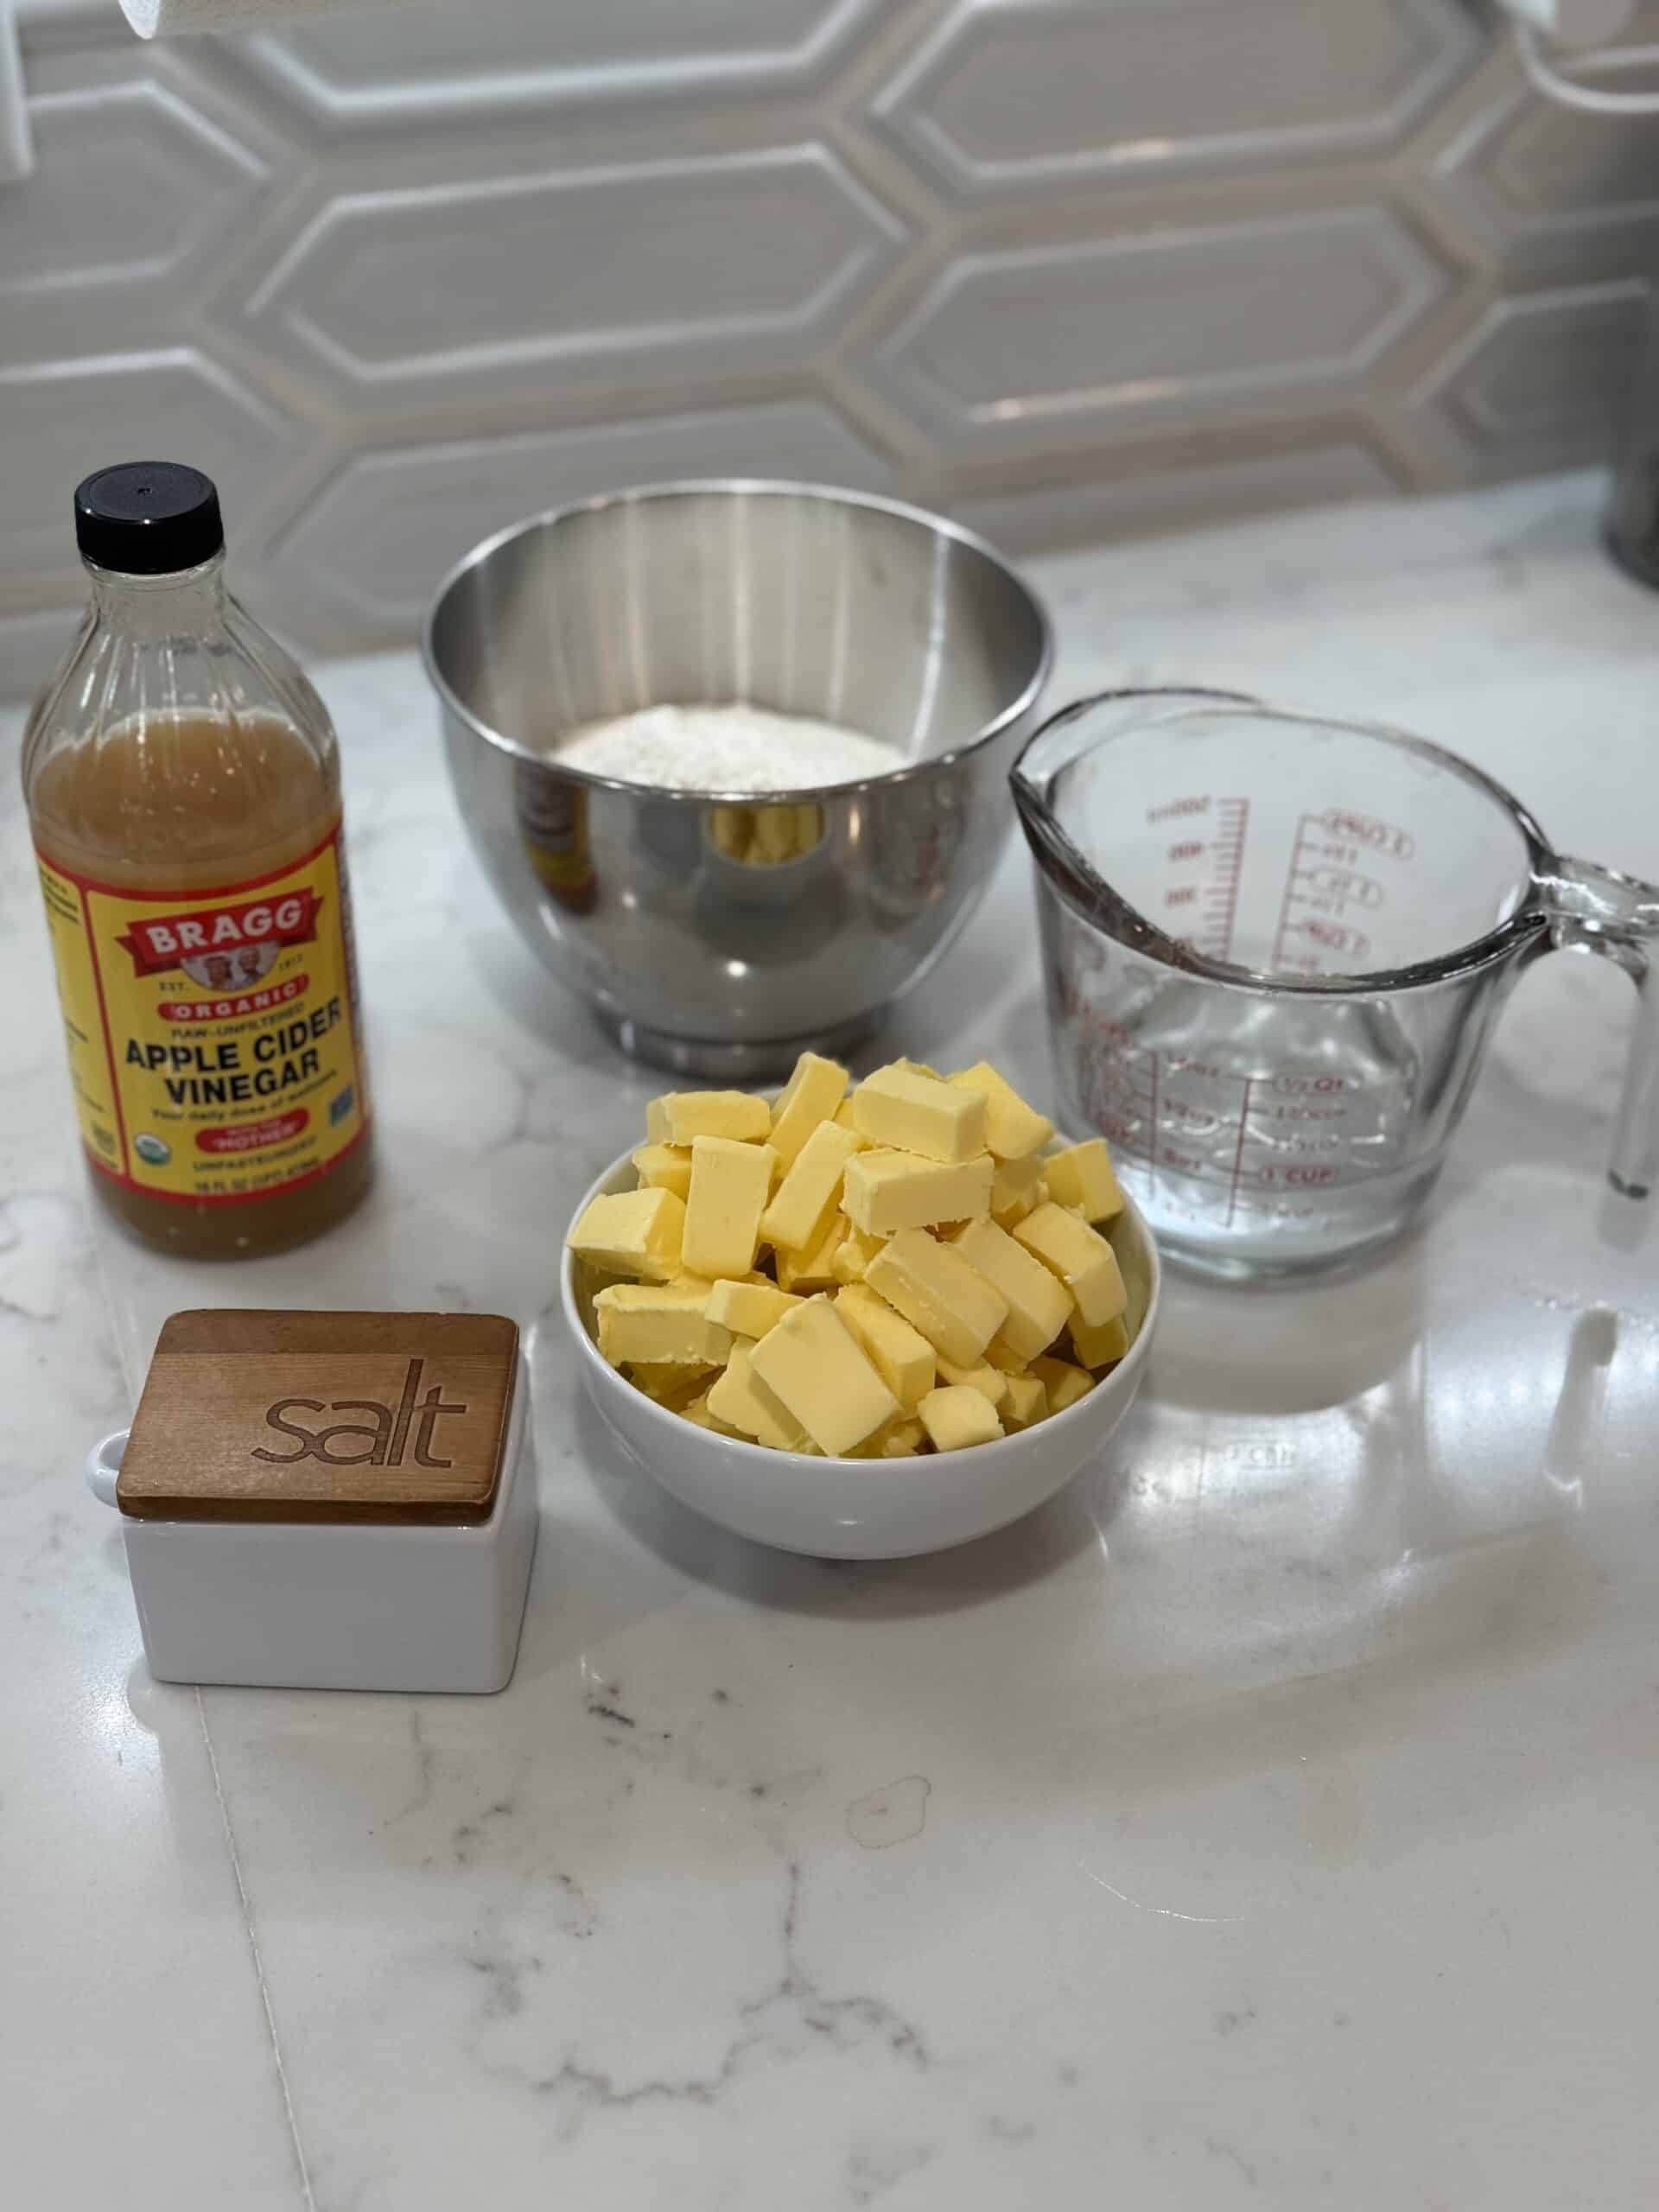
Ingredients You Need and Why
Understanding why these ingredients matter helps you become a more confident baker. Each has a purpose in building the texture, flavor, and structure of your crust.
- 20 tablespoon salted butter (very cold) - Butter is responsible for both flavor and flakiness. When cold butter hits hot oven air, it releases steam, creating distinct, tender layers. The slightly higher butter content in this recipe ensures extra richness.
- 1 teaspoon salt - Salt strengthens gluten just enough to make the dough workable and enhances the natural sweetness of fillings.
- 300 g all-purpose flour - Provides the structure. Measuring by weight ensures consistent hydration, which is key for even texture.
- 8 tablespoon ice water - Hydrates the flour while keeping the butter cold. The temperature contrast is crucial; if the butter melts too soon, the crust loses its layers.
- 2 teaspoon apple cider vinegar - A little science trick. Vinegar helps limit gluten formation and keeps the crust tender without affecting flavor.
Kendra's Top Tip: Think of the dough as a balance between structure and tenderness. Every cold ingredient helps you hold that balance perfectly.
Step by Step Guide
Making pie crust is all about temperature control, timing, and touch. With practice, you'll start to recognize how the dough should look and feel at every stage.
1. Prepare your ingredients and equipment
Freeze your butter cubes for 10 minutes. Chill the food processor bowl and blade if possible. Have your ice water ready, with an extra tablespoon or two in case the dough feels dry.
2. Combine dry ingredients
Add flour and salt to the food processor. Pulse a few times to distribute evenly.
3. Add the butter
Add cold butter cubes to the flour mixture. Pulse in short bursts until the texture resembles coarse crumbs with visible pea-sized butter pieces. These solid bits are what melt in the oven, creating flaky pockets of steam.
4. Add wet ingredients
Drizzle in the ice water and apple cider vinegar. Pulse just until the dough begins to clump. It should hold together when pinched but remain crumbly. Overmixing will overdevelop gluten, resulting in a tougher crust.

5. Form the beggar's purse
This is where technique meets tradition. Turn the dough out onto a lightly floured tea towel. Gather the towel corners up around the dough and twist gently, pressing the dough together inside the bundle. This method gently consolidates the dough without kneading it.
Why it works:
The beggar's purse method keeps your hands off the dough, minimizing heat transfer. It gently compresses the butter and flour into sheets instead of smearing them together, preserving the structure that creates flakiness. For beginners, this method prevents overworking; your dough will be cohesive but never dense.
Kendra's Tip: You should still see small streaks or specks of butter when you open the towel. Those visible bits are what make the magic happen.
6. Divide and chill
Unwrap the dough, divide into two equal disks, and wrap each tightly in plastic wrap. Chill at least one hour or up to two days. Resting time allows the flour to fully hydrate and the gluten to relax, which prevents shrinkage during baking.


Tips, Tools, and Troubleshooting
This section is your best friend in mastering pie crust. This simple pie crust recipe combines home-tested experience with the science of how butter, flour, and water interact, giving you confidence to troubleshoot any bake.
Tips & Techniques
- Always start cold and stay cold. Warm dough blends butter too fully, eliminating flaky layers. This includes using cold water.
- Chill before rolling and again before baking for the best structure.
- Avoid stretching dough when fitting it into the pie plate. Stretching shortens gluten strands unevenly, causing shrinkage in the oven.
- For an extra golden crust, brush lightly with beaten egg or milk before baking.
- A light dusting of flour is enough when rolling - too much will dry out the dough.
Tools I Recommend
- Food processor for quick, even mixing.
- Rolling pin with tapered ends for better control.
- Pastry scraper for lifting and folding dough cleanly.
- Kitchen scale for precise flour measurement.
- Pie weights or dried beans for blind baking.
- Pie dish (9 inch)
Troubleshooting
If you run into issues, here's how to fix them before they ruin your bake:
- Tough crust: The dough was overmixed or overhydrated. Handle minimally and add water a tablespoon at a time.
- Shrinking crust: The gluten didn't rest long enough. Chill the dough thoroughly before rolling and again before baking.
- Cracking dough: The dough is too cold or too dry. Let it rest 5 minutes at room temperature or mist with a few drops of water.
- Soggy bottom: The crust was underbaked or filled too soon. Prebake (blind bake) when making custard or cream pies.
- Sticky dough: Overly warm butter. Pop it back into the fridge for 10 minutes, then continue.

Variations, Substitutions, and Storage
Once you master this base pie crust recipe without shortening, you can start adapting it to suit every type of pie you love. Understanding how fat, flour, and liquid interact will help you adjust flavor and texture without losing the integrity of the pie dough.
Variations and Substitutions
- Unsalted butter: Works just as well; add an extra ½ teaspoon salt.
- Whole wheat flour: Replace up to 25% of the flour for a nuttier, rustic flavor.
- Lemon juice instead of vinegar: Adds a bright, subtle acidity that performs the same tenderizing function.
- Sweet crust: Add 1 tablespoon sugar for dessert pies like chocolate or berry.
- Savory version: Add fresh herbs or black pepper for quiche or chicken pot pie.
Serving and Storage
- Refrigerate dough up to 2 days.
- Freeze for up to 3 months. Wrap in plastic and foil, pressing out air pockets.
- Thaw overnight in the refrigerator.
- Always roll the dough while it's cool but pliable. If it cracks, let it rest 5 minutes before continuing.

Pie Crust Recipe FAQs
Salted butter adds both flavor and function. The added salt slightly strengthens the gluten network, making the dough more elastic and easier to roll out. It also deepens the overall flavor, which balances sweet fillings beautifully.
Apple cider vinegar is a gentle gluten inhibitor. By slightly lowering the dough's pH, it limits gluten formation and helps keep the crust tender. It also slows oxidation, which can dull the flavor of the flour if the dough rests for long periods.
Yes. Use a pastry cutter or your fingertips to rub the butter into the flour until you see pea-sized pieces. Work quickly to avoid melting the butter. If your kitchen runs warm, freeze your mixing bowl before you start.
It likely needs a bit more hydration. Add ice water one teaspoon at a time until it holds together when pinched. A dough that's too dry won't roll smoothly, but a dough that's too wet will bake up dense.
Shrinkage happens when the dough hasn't rested enough or was stretched too tightly into the pan. Always chill after rolling and press the dough gently into the corners instead of pulling it.
Yes. Line the chilled crust with parchment, fill with pie weights, and bake at 375°F for 15-20 minutes. Remove the weights and bake an additional 5-10 minutes until golden. Prebaking is essential for custard or cream pies to prevent soggy bottoms.
Absolutely. Prepare and refrigerate up to two days in advance or freeze for up to three months. Thaw overnight in the fridge before rolling. It's my go-to make-ahead crust for Thanksgiving pumpkin pies and Christmas pecan pies.
Flaky, crisp pie crust comes from keeping your butter cold, managing moisture, and avoiding overmixing. When cold butter hits the heat of the oven, the water in it turns to steam, creating thin, delicate layers that lift the dough and form flake. Minimal mixing keeps gluten strands short so the crust stays tender, while a small amount of vinegar helps prevent toughness by slightly weakening gluten bonds. For crispness, the dough needs just enough hydration to hold together but not so much that it steams instead of browns. Baking at a high enough temperature allows butter to brown, starches to caramelize, and moisture to evaporate, giving you that perfect balance of buttery layers and golden, crisp edges.
Cold butter is the key to creating flaky, structured pie crust because it controls how fat and water interact during baking. When cold butter is cut into flour, it stays solid and forms distinct pieces throughout the dough. As the crust bakes, the water in the butter rapidly turns to steam, expanding those pockets and separating the dough into delicate, crisp layers. If the butter warms and blends too much before baking, it coats the flour and eliminates those pockets, leading to a dense, greasy crust instead of a flaky one. Keeping everything cold, from the butter to the mixing bowl, preserves the butter's structure, limits gluten development, and ensures a light, tender texture that holds its shape beautifully once baked.
Recipe

The Best Easy Pie Crust Recipe (Flaky & Foolproof)
Equipment
- 1 food processor for quick, even mixing without overworking the dough
- 1 Rolling Pin helps create smooth, even layers when rolling out chilled dough
- 1 pastry scraper or bench scraper makes it easy to lift and fold the dough while keeping your work surface tidy
- 1 Digital kitchen scale ensures precise flour and butter measurements for consistent results
- Measure cups and spoon set for water, vinegar, and salt
- Mixing Bowls useful if you're mixing by hand instead of with a food processor
- Tea towel or kitchen towel essential for the beggar's purse method (prevents overhandling and keeps butter cold)
- Plastic wrap or reusable beeswax wrap for chilling the dough without drying it out
- 2 Pie dish (9-inch) standard size for most recipes
- parchment paper for blind baking and rolling out dough cleanly
- Pie weights or dried beans prevent puffing during blind baking
- Cooling Rack helps the crust set evenly after baking
Ingredients
- 20 tablespoons salted butter very cold, cut into cubes
- 1 teaspoon salt
- 300 grams all-purpose flour
- 8 tablespoons ice water plus a little extra if needed
- 2 teaspoons apple cider vinegar
Instructions
Prepare and chill all ingredients.
- Freeze butter cubes for 10 minutes and chill your food processor bowl and blade if possible. Keep your ice water cold to maintain proper dough temperature.
Combine flour and salt.
- Add flour and salt to the food processor and pulse a few times to combine evenly. This ensures the salt is distributed throughout the dough.1 teaspoon salt, 300 grams all-purpose flour
Add cold butter.
- Add the butter cubes to the flour mixture and pulse in short bursts until the mixture resembles coarse crumbs with a few pea-sized butter pieces visible. These butter bits create steam pockets as they bake, forming flaky layers.20 tablespoons salted butter
Add water and vinegar.
- Drizzle in the ice water and apple cider vinegar. Pulse just until the dough begins to clump together. It should hold when pinched but still look slightly crumbly. Avoid overmixing to prevent excess gluten development.8 tablespoons ice water, 2 teaspoons apple cider vinegar
Form the beggar's purse.
- Turn the dough out onto a lightly floured tea towel. Gather the corners of the towel and twist gently to bring the dough together into a loose bundle. This beggar's purse method gently compresses the dough without kneading, preserving visible butter layers that lead to maximum flake.
Divide and chill.
- Unwrap the dough, divide it into two equal disks, and wrap each tightly in plastic wrap. Chill for at least one hour or up to two days. Chilling relaxes gluten and allows the flour to fully hydrate, resulting in a tender, easy-to-roll crust.
Roll and shape.
- Roll out chilled dough on a lightly floured surface until it's about ⅛ inch thick. Fit into your pie pan, trim excess, and crimp edges as desired. Avoid stretching the dough-it can cause shrinking during baking.
Blind bake (if needed).
- For custard or cream pies, line the chilled crust with parchment paper and fill with pie weights. Bake at 375°F for 15 to 20 minutes, remove weights, and bake another 5 to 10 minutes until lightly golden.
Cool before filling.
- Allow the baked crust to cool completely before adding any filling. Cooling helps the structure set and prevents sogginess.
Notes
Nutrition
What to Bake Next
If you love this flaky pie crust recipe, try these reader favorites next!
- Pumpkin Cheesecake - creamy and perfect for fall gatherings.
- Swiss Meringue Buttercream - an elegant topping for tarts or pies.
- Perfect Pillowy Soft Cinnamon Rolls - cozy baking at its best.
- Cake Pucks Made Easy - use leftover scraps for a fun treat with the kids.
If you bake this pie crust recipe, I'd love to hear about it. Leave a comment, tag @thebakerstablesc on Instagram, and share what your family filled it with. And, throughout October, November, or even December - drop me a note of your favorite pie crust recipe. I love hearing what you are baking!
Real ingredients. Real connection. Really good baking.
About Kendra Boettner
Hi, I'm Kendra, wife, mom of three, and the baker behind The Baker's Table. After 20+ years baking at home, including time working in professional kitchens, these are some of my favorite recipes I've learned along the way.
🧁 Want to see more? Join me on Instagram, Facebook, and Pinterest
1️⃣ My 'The Best No Bake Oatmeal Cookie" was my #1 recipe in 2025! Easy and kid friendly!
📋 Here are Kendra's favorite recipes
🍪 Or start with some of our readers' favorites:
- The Best Easy Pie Crust Recipe (Flaky and Foolproof)
- The Best Homemade Brownies (Chewy, Fudgy!)
- Lemon Meringue Bars with Swiss Meringue
- Cake Pucks Made Easy (Cake Pops without the Sticks)
- No-Bake Chocolate Mousse Pie with Oreo Crust
📋 Browse all of my recipes
🔗 The Baker's Table is Featured in:
🔗 Visit the About Me page to learn more about Kendra, Eric, and The Baker's Table!

Comments
No Comments