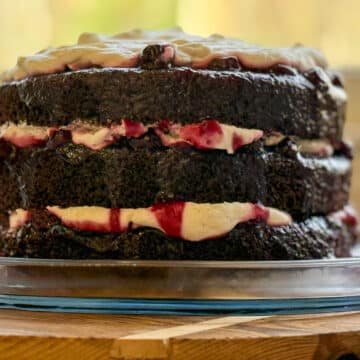
A rich, silky chocolate mousse pie with an Oreo cookie crust and a cloud of whipped cream on top. This is a no bake dessert with bold chocolate flavor that feels elegant enough for holidays and special gatherings, yet simple enough to make ahead for family dinners. This chocolate mousse pie with Oreo crust is rich, creamy, and easy to make ahead. A no bake holiday dessert perfect for Christmas, Valentine's Day, and entertaining. | Prep Time: 35 minutes | Bake Time: 10 minutes (optional, see no bake note) | Chill Time: 6 hours or overnight | Total Time: About 7 hours | Yield: 1 (9-inch) pie, serves 10-12

A no bake chocolate dessert that feels special
This chocolate mousse pie with Oreo crust is the kind of dessert that earns its place at the center of the table. It is deeply chocolatey without being heavy, light without being fragile, and rich without crossing into overly sweet. It feels celebratory, which is why it has become a favorite for Christmas gatherings in our home, and it is just as fitting for Valentine's Day when you want something romantic but unfussy.
One of the things I love most about this recipe is how well it fits real family life. It is a true make ahead dessert, which means you can prepare it the day before, tuck it into the refrigerator, and focus on the people you are serving rather than rushing around the kitchen. That alone makes it a gift during busy seasons.
Although the crust in this recipe is baked briefly, the filling itself is completely no bake. If you want a truly no oven dessert, you can absolutely use a store bought Oreo or chocolate cookie crust and skip turning on the oven altogether. That flexibility makes this a practical choice for warm weather, busy holidays, or any time you want a high impact dessert with low stress.
If you love chocolate desserts that feel special but approachable, you might also enjoy our Flourless Chocolate Cake, which delivers a similar richness with a different texture, or our Best No Bake Oatmeal Cookies, a go-to when you need something sweet that kids can help make.
Key Takeaways
- This chocolate mousse pie with Oreo crust is a no bake dessert that is rich, creamy, and perfect for holidays.
- It features a flexible preparation: use a baked crust or a store-bought one for convenience.
- The mousse is light yet stable, thanks to a unique combination of whipped egg whites and cream.
- Perfect for make-ahead planning, it requires chilling time and can be served for gatherings.
- The recipe includes essential tips for temperature management and folding techniques to ensure success.
- Perfect dessert for Valentine's Day, Christmas, or entertaining.
Jump to:
- A no bake chocolate dessert that feels special
- Key Takeaways
- Why This Is My Go-To Valentine's Day Dessert
- Ingredients you need and why they matter
- How to make this easy and delicious dessert
- Tips, tools, and troubleshooting
- Variations, substitutions, and storage
- Recipe FAQs
- Recipe
- What to bake next
- If You Loved This, Try These!
- Comments
Why This Is My Go-To Valentine's Day Dessert
This recipe is designed to serve both the baker and the people gathered around the table. It is rich, creamy, and easy to make ahead. I think it's the perfect no bake holiday dessert ideal for Christmas or Valentine's Day. It's also a great option for entertaining a crowd. And, it's one of husband's favorite desserts!!
This chocolate mousse pie is one of my favorite Valentine's Day desserts because it feels special without being complicated. Chocolate desserts naturally shine on Valentine's Day, and this one delivers rich flavor with a light, creamy texture that feels romantic without being overly heavy. Because the mousse filling is no bake and the pie can be made entirely ahead of time, it is an ideal Valentine's Day dessert for busy schedules, whether you are planning a quiet night at home or hosting friends. If you are looking for an easy chocolate dessert for Valentine's Day that still feels thoughtful and homemade, this pie fits that moment beautifully.
- Rich, layered chocolate flavor that tastes bakery quality
- Light, airy mousse texture that slices cleanly and beautifully
- Easy to make ahead, ideal for holidays and entertaining
- No bake filling with a flexible crust option
- Family friendly and kid approved
- Elegant enough for Christmas and Valentine's Day, yet simple enough for everyday gatherings
f you're building a Valentine's dessert table, this pie pairs beautifully with The Best Homemade Brownies (Chewy, Fudgy!) for something rich, chocolatey, and easy to share.

Ingredients you need and why they matter
Understanding why each ingredient matters helps you bake with confidence and troubleshoot when needed. This recipe uses simple ingredients, but each one plays a specific role in the final texture and structure.
Oreo crust
- Oreo cookies (filling included): the filling helps bind the crumbs and adds that classic cookies-and-cream sweetness.
- Melted butter: butter is the glue. It coats the crumbs so the crust firms up into clean slices.
Chocolate mousse filling
This section is the heart of the recipe, and the technique matters more than fancy ingredients.
- Semisweet chocolate: provides structure as it cools and sets. Chocolate is doing double duty here, flavor andstability.
- Cocoa powder: intensifies the chocolate flavor without adding extra sweetness or fat.
- Strong coffee or espresso: coffee does not make it taste like coffee, it makes it taste more like chocolate.
- Eggs (separated): yolks add richness and a smooth mouthfeel. Whites add lift. The mousse is "light" because of tiny air bubbles trapped in the whites and cream.
- Powdered sugar: dissolves instantly, which helps keep the mousse silky.
- Salt: a full teaspoon looks bold, but it is doing important work balancing sweetness and sharpening chocolate flavor.
- Heavy cream: gives the mousse its lush texture and helps it feel airy when whipped.
- Vanilla: rounds out chocolate so it tastes full, not flat.
Whipped cream topping
- Heavy cream + powdered sugar + vanilla: a soft, stable topping that cuts the richness of the mousse.
- Chocolate curls or grated chocolate: garnish, yes, but also texture. That little bite on top makes each slice feel finished.
Food safety note
This recipe uses uncooked eggs. Grocery store eggs in the United States are pasteurized and generally considered safe for this use. If you prefer, cartoned pasteurized egg whites may be substituted for the whipped egg whites.
How to make this easy and delicious dessert
Before diving into the recipe card, it helps to understand the process as a whole.
This chocolate mousse pie is built in layers of technique. First, the crust is prepared and allowed to cool completely. Then the chocolate base is melted gently and enriched with egg yolks. Separately, egg whites and cream are whipped to incorporate air. Those airy components are folded into the chocolate base to create a mousse that is light but stable.
The final step is patience. Time in the refrigerator allows the chocolate to firm up and the structure created by the eggs and cream to set fully. This is not a dessert you rush, and that is part of why it works so well for make ahead baking.
One encouragement from my own kitchen: if you have kids underfoot, this is a great recipe to break into pockets of time. Make the crust earlier in the day, do the mousse after dinner, chill overnight, then whip cream before serving. It is a calm, make-ahead rhythm.
Chocolate mousse filling
The chocolate mousse filling is where this recipe truly shines, and it is also where most home bakers feel the most intimidated. Let's break down what is happening so you can approach it with confidence.
This is a classic French-style chocolate mousse adapted for a home kitchen. There is no gelatin, no pudding mix, and no shortcuts. Instead, the structure comes from a careful balance of melted chocolate, eggs, and cream.
Why this mousse uses eggs
Eggs are doing real work here. The yolks add fat and act as emulsifiers, helping the chocolate and liquid blend smoothly. The whites, when whipped, create a foam that holds air. That trapped air is what gives mousse its light texture.
When you fold whipped egg whites into the chocolate mixture, you are essentially suspending air bubbles inside a chocolate network. As the mousse chills, the chocolate firms up and locks that structure in place.
The role of whipped cream
Whipped cream softens the intensity of the chocolate and adds creaminess. It also contributes additional air, but in a gentler way than egg whites. Together, whipped whites and whipped cream create a mousse that is light, creamy, and stable enough to slice.
Blooming cocoa and chocolate
Adding hot coffee to cocoa powder and chopped chocolate is not just about melting. Heat activates flavor compounds in cocoa, a process called blooming. The coffee does not make the mousse taste like coffee. Instead, it deepens the chocolate flavor, making it taste richer and more complex.
Why powdered sugar matters
Powdered sugar dissolves instantly into the egg yolks. Granulated sugar would require heat to dissolve fully, which we are not using here. Using powdered sugar ensures a smooth, non-grainy mousse.
This chocolate mousse filling can be used well beyond this pie, which we will explore later.
No bake versus no oven
This recipe is best described as no bake with an optional baked crust.
The filling requires no oven time at all. Its structure comes from technique and chilling, not baking. If you want to keep the oven completely off, a store bought Oreo or chocolate cookie crust works beautifully and makes this a true no oven dessert.
Baking the crust briefly helps it hold together and adds a slightly crisper texture, but it is not essential. This flexibility makes the recipe adaptable to different seasons and schedules.

Tips, tools, and troubleshooting
Chocolate mousse is not hard, but it is sensitive. The difference between "pretty good" and "wow" usually comes down to temperature, how you whip, and how gently you fold. Think of this recipe like building a soft structure out of air bubbles, and your job is to protect those bubbles while the chocolate and fat set around them.
Tips and techniques
1. Manage temperature like a pro (chocolate and eggs)
The biggest risk point in this recipe is when warm chocolate meets eggs. Eggs begin to thicken and set at relatively low temperatures. If the chocolate mixture is too hot, the yolks can scramble and create little bits, which shows up as graininess later.
- After melting, let the chocolate mixture sit just a minute or two so it is warm and fluid, not steaming hot.
- The tempering steps in the recipe are there to protect you. Adding a small amount of warm chocolate to the yolks slowly brings the yolks up in temperature without shocking them.
- If you ever feel unsure, you can test the chocolate mixture by touching a tiny bit to your lip or wrist. It should feel warm, not hot.
Why this matters: tempering prevents scrambled egg pieces, and it keeps the mousse silky.
2. Bloom the cocoa fully (why coffee matters)
Cocoa powder is packed with flavor compounds, but those flavors "wake up" best when cocoa is mixed with a hot liquid. That is what the coffee or espresso is doing here. Even if you do not love coffee, you will still love what it does for chocolate.
- The hot coffee helps dissolve and hydrate the cocoa.
- It also deepens the chocolate flavor without extra sweetness.
- The goal is not coffee flavor. It is richer chocolate.
What not to do: do not use cold coffee. It will not bloom the cocoa as effectively, and the chocolate flavor will taste flatter.
3. Soft peaks are not optional (egg whites)
When you whip egg whites, you are unfolding protein strands and trapping air into a foam. Soft peaks means the foam is strong enough to hold air, but still flexible enough to fold smoothly into chocolate.
- Soft peaks look glossy and the tip of the peak folds over like a gentle hook.
- Stiff peaks look more dry and stand straight up.
Why stiff peaks are a problem: over whipped whites are tighter and drier. They break and deflate more easily during folding, so you lose volume. They can also create a slightly grainy, uneven texture.
What to watch for: if egg whites start looking clumpy, dry, or dull instead of glossy, they are getting over whipped.
4. Soft peaks again (whipped cream)
Whipped cream adds creamy richness and makes the mousse feel airy on the tongue. The texture of your final mousse is closely tied to how you whip the cream.
- Soft peaks means the cream holds shape but still looks pillowy and smooth.
- If you whip until it is stiff, it becomes heavier and harder to fold.
Why over whipped cream is a problem: cream is a fat and water emulsion. Over whipping pushes it toward butter. Even before it turns to butter, the fat structure tightens, and when you fold it into chocolate, it can leave little lumps and make the mousse feel dense.
Quick test: lift the beater. The cream should form a soft mound that gently slumps. If it looks stiff and sharp, stop.
5. Folding is not stirring (protect the air)
Folding is where mousse is made or broken. You are combining heavy chocolate with light foams. If you mix aggressively, you pop the air bubbles you worked so hard to create.
A simple way to fold:
- Use a silicone spatula.
- Cut down through the center, scrape along the bottom, and lift up and over.
- Rotate the bowl and repeat.
Why you start with one third of the whites: that first addition is called "lightening." It loosens the chocolate mixture so the remaining whites can fold in more gently without being crushed.
Stop at the right time: when folding egg whites, it is okay to stop when a few faint streaks remain, because you will still fold again when you add whipped cream. Over folding is more damaging than a tiny streak.
6. Chill time is part of the recipe (how mousse sets)
This mousse sets primarily because chocolate firms up as it cools. The whipped egg whites and whipped cream provide structure, but the chocolate network is what locks the whole thing into a sliceable texture.
- If the pie is cut too early, it will look loose and may slump.
- After 6 hours, it should be set. Overnight is even better.
Why overnight is best: the mousse becomes more uniform as temperature equalizes and the fat crystals in the chocolate stabilize. You get cleaner slices and a smoother mouthfeel.
7. The no bake and no oven note (crust choice matters)
The filling is truly no bake. The crust step includes a quick oven bake to set it, but if you want no oven at all, use a store bought crust.
- Store bought Oreo crust
- Store bought chocolate cookie crust
What changes: the pie is still delicious either way. The baked crust will be slightly crisper. The store bought crust is the easiest path, and it is a great choice for busy seasons.
Tools I recommend
These tools keep the technique simple and consistent:
- Heatproof bowl and saucepan: gentle indirect heat prevents scorching and seizing.
- Hand mixer or stand mixer: consistent whipping makes soft peaks easier to hit. I recently bought a NEW Kitchen Aid mixer and I LOVE IT!
- Silicone spatula: flexible edge helps you fold without deflating.
- 9-inch springform pan: clean unmolding and easy serving.
- Instant read thermometer (optional but super helpful): if you love confidence, checking chocolate temperature takes the guesswork out.
Troubleshooting common issues
Mousse looks loose before chilling
Totally normal. The mousse is a foam suspended in melted chocolate. It will firm up as the chocolate sets in the refrigerator. Judge it after chilling, not immediately after mixing.
Grainy texture
Most common causes:
- Chocolate mixture was too hot and partially cooked the eggs.
- Egg whites were over whipped and broke into dry bits.
- Cream was over whipped and formed tiny butter-like grains.
How to prevent it next time:
- Let chocolate cool slightly before tempering.
- Stop whipping at soft peaks.
- Fold gently and stop when incorporated.
Chocolate seized
Seizing happens when chocolate comes into contact with water or overheats. Even a tiny splash of water can cause the chocolate to clump.
Fix:
- Keep steam from entering the bowl. Wipe condensation off the bottom if needed.
- Use gentle simmering water, not a rolling boil.
- Stir slowly and consistently.
Pie did not set
Usually one of these:
- Not chilled long enough.
- The whipped components were under whipped, so the mousse had less structure.
- The mixture was over folded, deflating too much air.
Fix:
- Chill longer, ideally overnight.
- Next time, hit soft peaks for both whites and cream.
- Fold gently and stop as soon as incorporated.
Whipped cream topping weeps or slides
This can happen if the cream is under whipped, over whipped, or the pie surface has condensation.
Fix:
- Whip topping to soft peaks, not runny, not stiff.
- Add topping close to serving for best results.
- Keep pie covered while chilling to reduce condensation.
Variations, substitutions, and storage
Crust options for chocolate mousse pie
- Oreo crust for bold chocolate flavor
- Graham cracker crust for lighter contrast
- Chocolate wafer crust for deeper cocoa notes
- Store bought crust for a true no bake dessert
Using the chocolate mousse outside the pie
This no-bake chocolate mousse pie filling is versatile.
- Spoon into glasses for individual mousse cups
- Use as a cake filling
- Pipe into tart shells
- Serve with berries as a plated dessert
Storage and make ahead
- Store covered in the refrigerator for up to 3 days
- Add whipped cream topping close to serving
- Ideal for making one day ahead of holidays and gatherings

Recipe FAQs
Yes. Use a store-bought Oreo crust or premade cookie crust and skip baking the crust. The mousse filling is already no-bake.
They create two different kinds of lift. Egg whites give a lighter, airier foam. Whipped cream gives a richer, creamier foam. Together, they make mousse feel both fluffy and luxurious.
When you lift the beaters, the peak should bend over gently. It should hold shape, but not stand straight and stiff.
You can, but expect a sweeter pie with a softer set because milk chocolate has more sugar and milk solids. Semisweet gives the best balance and structure.
Most often, it just needs more time. Chill at least 6 hours, and overnight is best. If your cream was under-whipped (very loose) or the chocolate mousse pie mixture was too warm when you folded, setting can take longer.
Yes. Make it, portion it into cups or a bowl, cover tightly, and refrigerate up to 2 days. If it thickens too much to spread, let it sit at room temp for 10-15 minutes, then stir gently.
This recipe uses uncooked eggs. Grocery store eggs in the U.S. are pasteurized and generally considered safe for this use. If you prefer, use pasteurized eggs or cartoned pasteurized egg whites for the whipped whites.
Recipe
Chocolate Mousse Pie
Equipment
- 1 mixing bowl set
- 1 Heatproof bowl
- 1 Saucepan for double boiler
- 1 stand mixer with whisk attachment; hand mixer works too
- 1 Silicone spatulas
- 1 9-inch springform pan
- 1 Measuring Cup and Spoon Set
- 1 Instant read thermometer (optional)
- 1 Offset spatula (optional, for smoothing the mouse)
Ingredients
Oreo Crust:
- 8 oz Oreo cookies about 24 cookies, filling included
- 5 tablespoon salted butter melted
Chocolate Mousse Filling:
- 12 oz semisweet chocolate finely chopped
- 3 tablespoon cocoa powder
- ½ cup strong coffee or espresso
- 3 large eggs separated
- ½ cup powdered sugar
- 1 teaspoon table salt
- 2 cups heavy cream
- 1 teaspoon vanilla extract
Whipped Cream Topping:
- 1 ½ cups heavy cream
- ⅓ cup powdered sugar
- 1 teaspoon vanilla extract
- Chocolate shards curls, or grated chocolate, for garnish
Instructions
Make the Crust:
- Preheat the oven to 350°F (175°C). Butter a 9-inch springform pan.
- Place the Oreo cookies in a food processor and pulse until finely crushed.8 oz Oreo cookies
- Transfer crumbs to a bowl and mix with the melted butter until evenly combined.5 tablespoon salted butter
- Press the crumbs firmly and evenly into the bottom of the prepared pan. Use parchment or plastic wrap to prevent sticking.
- Bake the crust for 10 minutes, then remove from the oven and allow it to cool completely. Set aside.
Make the Chocolate Mousse Filling:
- Place the chopped chocolate, cocoa powder, and coffee in a large heatproof bowl set over a pot of gently simmering water (do not let the bowl touch the water).12 oz semisweet chocolate, 3 tablespoon cocoa powder, ½ cup strong coffee or espresso
- Stir frequently until the chocolate is nearly melted. Remove from heat and continue stirring until completely smooth. Set aside to cool slightly.
- In a small bowl, whisk the egg yolks, powdered sugar, and salt until the mixture lightens in color and thickens slightly, about 30 seconds.3 large eggs, ½ cup powdered sugar, 1 teaspoon table salt
- While whisking continuously, slowly add a ladle of the warm chocolate mixture to the yolks to temper them. Repeat once more.
- Scrape the yolk mixture back into the bowl with the remaining chocolate and whisk until fully combined.
- In a clean bowl, beat the egg whites using a hand mixer or stand mixer with the whisk attachment until soft peaks form.
- Gently fold about one-third of the egg whites into the chocolate mixture to lighten it, then fold in the remaining whites just until streaks remain.
- In the bowl used for the egg whites, add the heavy cream and vanilla. Beat until soft peaks form.2 cups heavy cream, 1 teaspoon vanilla extract
- Gently fold the whipped cream into the chocolate mixture until smooth and fully incorporated.
Chill:
- Pour the mousse into the cooled crust and spread evenly.
- Cover with plastic wrap and refrigerate overnight (or at least 6 hours) until fully set.
Serve:
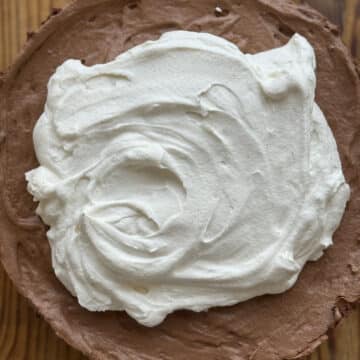
- When ready to serve, whip the 1 ½ cups heavy cream, powdered sugar, and vanilla until soft peaks form.1 ½ cups heavy cream, ⅓ cup powdered sugar, 1 teaspoon vanilla extract
- Mound the whipped cream over the top of the pie.
- Finish with chocolate shards, curls, or grated chocolate, if desired.Chocolate shards
- To unmold, run a thin knife around the edge of the pan. Serve on the springform base or carefully transfer to a serving plate.
Notes
-
Why I bake with salted butter:
I always bake with salted butter, and this recipe is no exception. As I've shared in other posts here at The Baker's Table, salted butter gives baked goods better overall flavor and balance, especially in chocolate desserts. Salt enhances cocoa and chocolate, helping those flavors taste deeper and more complex rather than flat or overly sweet. Because I develop my recipes using salted butter consistently, the salt levels in this pie are intentional and tested for balance. If you use unsalted butter instead, the flavor will be noticeably less vibrant unless additional salt is added elsewhere. -
No-bake clarification:
The chocolate mousse filling for this pie is completely no bake. The only baked step is the Oreo crust, which helps it hold together and slice cleanly. If you want a truly no-oven, no-bake chocolate mousse pie, you can use a store-bought Oreo or chocolate cookie crust and skip baking the crust entirely. -
Make-ahead friendly:
This chocolate mousse pie is an ideal make-ahead dessert for holidays, entertaining, and busy family schedules. It actually improves with time in the refrigerator. I recommend making it the day before serving so the mousse can fully set and slice cleanly. -
Egg safety:
This recipe uses uncooked eggs. In the United States, grocery store eggs are pasteurized and generally considered safe for this type of recipe. If you prefer, you can substitute pasteurized eggs or cartoned pasteurized egg whites for the whipped egg whites portion. -
Why powdered sugar is used:
Powdered sugar dissolves instantly into the mousse, which helps ensure a smooth, non-grainy texture. This is especially important in no-bake desserts where sugar does not have the benefit of heat to dissolve fully. -
Serving tip:
For the cleanest slices, run a thin knife under hot water, wipe it dry, and then slice the pie. Wipe the knife between cuts. This small step makes a big difference, especially when serving for holidays or special occasions.
Nutrition
What to bake next
If you loved how rich but light this chocolate mousse pie is, try our Fudgy Gluten-Free Chocolate Cake for another showstopper that feels bakery-level but still doable at home. Or keep the holiday dessert momentum going with Easy Pumpkin Cheesecake with Gingersnap Crust, which is always a crowd favorite for fall and Christmas gatherings. And if you need a quick treat for a cookie platter, our Homemade Snickerdoodles with White Chocolate Chips are kid-approved and freezer-friendly.
If you make this pie, I would love for you to rate it and leave a comment, it helps other home bakers know what to expect. And if you are saving recipes for holidays, please pin it or share it with a friend who loves chocolate. Finally, if you want more from-scratch desserts and simple technique training, come join our weekly baking email.
When you want a dessert that feels special and still fits real life, this chocolate mousse pie with Oreo crust is one you will come back to.
About Kendra Boettner
Hi, I'm Kendra, wife, mom of three, and the baker behind The Baker's Table. After 20+ years baking at home, including time working in professional kitchens, these are some of my favorite recipes I've learned along the way.
🧁 Want to see more? Join me on Instagram, Facebook, and Pinterest
❤️ Check out my go-to, favorite Valentine's Day recipes!
📋 Here are Kendra's favorite recipes
🍪 Or start with some of our readers' favorites:
- The Best Easy Pie Crust Recipe (Flaky and Foolproof)
- The Best Homemade Brownies (Chewy, Fudgy!)
- Lemon Meringue Bars with Swiss Meringue
- Cake Pucks Made Easy (Cake Pops without the Sticks)
- No-Bake Chocolate Mousse Pie with Oreo Crust
1️⃣ My 'The Best No Bake Oatmeal Cookie" was my #1 recipe in 2025! Easy and kid friendly!
📋 Browse all of my recipes
🔗 The Baker's Table is Featured in:
🔗 Visit the About Me page to learn more about Kendra, Eric, and The Baker's Table!
Checkout my husband's newest project - Weekend Pitmaster Smoke Planner - a tool to help plan your BBQ timeline with expert precision. I'm biased, but it's pretty cool!


Comments
No Comments